https://support.apple.com/ja-jp/111883
As of April 2026, the latest MacBook Air models offered by Apple are equipped with the M5 chip. In addition to the MacBook Air lineup, Apple has also begun releasing the MacBook Neo. The MacBook Neo is said to offer performance comparable to the MacBook Air M1, which led me to purchase a used M1 MacBook Air and actually start app development and a blog focused on app development.
In this article, I’ve put together my experience.
Overview of the M1 MacBook
The MacBook Air M1 is a MacBook Air model announced by Apple in late 2020. The M1 chip, designed by Apple, marked a major shift from the Intel processors used in previous MacBook models. Compared to those Intel-based systems, it delivered significantly higher CPU and GPU performance, entering the market as a new generation of MacBook with a substantial leap in efficiency and processing power.
When the MacBook Air M1 was first released, I also purchased one and used it extensively. It served me well for running WordPress sites at home and developing Android and iPhone apps, until I eventually switched to a Mac mini M2 Pro.
This Isn’t My First Time Buying an M1 MacBook Air
As mentioned earlier, I had been using the MacBook Air M1 for app and web development until I switched to the Mac mini M2 Pro.
This time, with the release of the MacBook Neo, I decided to purchase a used M1 MacBook Air again. Through this, I aim to compare it with the MacBook Neo and highlight the strengths and appeal of the MacBook Air M1.
Let’s Start with a Benchmark Comparison: MacBook Neo vs. M1 MacBook Air
First, let’s take a look at the performance comparison between the chips used in the MacBook Neo and the MacBook Air M1. The MacBook Neo is equipped with the A18 Pro chip—the same chip used in the iPhone 16 Pro—while the MacBook Air M1 features Apple’s M1 chip.
Below is a benchmark comparison of these two chips.


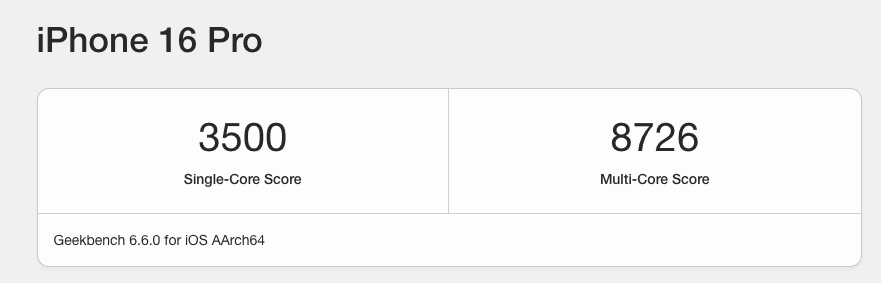
https://browser.geekbench.com/v6/cpu/17486755
Differences in Support Lifecycle and Hardware Aging: M1 MacBook Air vs. MacBook Neo
When comparing the MacBook Air M1 and the MacBook Neo, two important factors to consider are the software support lifecycle and the physical condition of the hardware.
First, in terms of software support, the M1 MacBook Air was released in 2020. While Apple typically provides long-term macOS updates, it is inevitable that support for older devices will eventually be discontinued. In contrast, the MacBook Neo is a much newer device, which means it is expected to receive updates and security patches for a longer period going forward. From a long-term operational perspective, this gives the MacBook Neo a clear advantage.
On the other hand, hardware aging is another critical consideration—especially when purchasing a used device. Since the M1 MacBook Air has been on the market for several years, individual units may show signs of wear such as battery degradation, keyboard usage wear, or display issues (as in my case). These factors can directly impact usability and may require additional cost for repair or replacement parts.
In contrast, the MacBook Neo, being a newer product, is less likely to have such physical degradation, particularly if purchased new. This generally results in a more stable and predictable user experience without immediate concerns about hardware deterioration.
Ultimately, the choice between the two depends on your priorities. If you value lower upfront cost and are comfortable managing potential hardware wear, the M1 MacBook Air remains a strong option. However, if you prioritize long-term support, reliability, and minimal maintenance, the MacBook Neo may be the better investment.
That said, in this article, I intentionally chose the M1 MacBook Air not only because of its significantly lower price, but also because it uses a chip designed for full desktop-class computing, making it better suited for sustained development workloads.
Price I Paid for a Used M1 MacBook Air
I’m writing this article in Tokyo, Japan. I purchased a used MacBook Air M1 through Mercari, a popular marketplace service in Japan.
Because the unit I bought had an issue with the display, I was able to get it for around ¥35,000 (approximately $230), which is cheaper than the typical used market price.
Why I Chose a Damaged M1 MacBook Air Over a Mac mini
Instead of buying an Mac mini M1, I chose to purchase a MacBook Air M1 with a faulty display because it was significantly more cost-effective.
In the used market, fully functional Mac mini M1 units still tend to maintain a relatively stable price. In contrast, MacBook Air units with hardware issues—especially display-related problems—are often sold at a steep discount. Since I was planning to use the device with an external monitor anyway, the broken display was not a critical drawback for my use case.
By taking this approach, I was able to acquire an M1-based Mac at a much lower price while still maintaining a fully capable development environment. From a cost-performance perspective, this made the damaged MacBook Air a more practical and efficient choice than purchasing a standard Mac mini.
Switching from Windows to Mac
I switched from a Windows laptop I bought in 2019—an 8GB RAM, 256GB SSD Dell laptop with Intel i5-8365U—to the MacBook Air M1, and the performance improvement felt significant.
Although the M1 MacBook Air is now a six-year-old machine, I was reminded that it still offers a surprisingly high level of performance even today.
Setting Up the Mac I Bought
Since the display was faulty, I first purchased a USB-C hub and connected the Mac to an external monitor via HDMI to get started.
Installing Development Tools
After setting up the external display, I proceeded to install the necessary tools on the Mac for development.
Since I planned to work on app development, I installed the following:
- Xcode
- Android Studio
- Visual Studio Code
- Codex
I also installed Unity for game development purposes.
Installing Additional Tools
These may not be strictly development tools, but I installed them as they are essential for my daily workflow:
- Splashtop
- WireGuard (client)
- Google Chrome
In addition, since I create and upload videos to YouTube, I also installed the following:
- OBS Studio
- DaVinci Resolve
Starting an App Development Blog
When starting app development, I decided not only to build apps but also to organize and share what I learn throughout the process.
I’m publishing content related to app development on the following site:
https://app-dev.website-industries.com
Instead of using a typical hosting service, I set up my own environment on Google Cloud to run WordPress.
Setting Up the WordPress Site
Just like the Mac, I performed various setup steps for the WordPress site I launched.
First, I installed and configured essential plugins, including:
- Yoast SEO
- Google Site Kit
- Easy Table of Contents
- Simple Blog Card
Along with these, I installed and set up several other necessary plugins as well.
Future Outlook for App Development
At WI Japan, we operate an IT certification learning platform and publish content through WordPress. In addition, at IG Japan, we are involved in game development. Moving forward, I plan to bring this existing content and experience into apps—transforming what we already do into more refined and practical software.
I also intend to continue sharing insights about the apps I develop, along with development knowledge and best practices, on the site introduced earlier.
Conclusion
Even in 2026, in what could be called the M5 era, the MacBook Air M1 still proves to be a highly capable machine. Despite being several years old, it handles modern workloads such as app development, web development, and content creation without major limitations.
By purchasing a used unit at a low cost, I was able to build a practical development environment, start a new app development workflow, and launch a blog to document and share that journey. From a cost-performance perspective, the M1 MacBook Air remains an extremely attractive option—especially for developers who want to get started without heavy upfront investment.
Comparing it with newer devices like the MacBook Neo also highlights an important point: raw specs alone don’t define productivity. What matters more is how effectively you can leverage the tools and environment you have.
Going forward, I plan to continue developing apps, refining my workflow, and sharing actionable knowledge through my blog. If you’re considering starting app development or building your own development environment, the M1 MacBook Air is still more than capable of getting the job done.
Related posts:
 Contents For Engineers
 App Development
 How to Get Started with Android App Development Using Flutter